A blog for (semi) athletic middle-aged men (and women) holding on to (the last vestiges of) their youth
by training for and competing in running, cycling, swimming and triathlon events!


Tuesday, December 30, 2014

It's the Ride the Rockies 2015 Route Premiere Party Announcement!

Christmas has past and the New Year is just around the corner. Every year at this time I start thinking about which "big event" I want to tackle in the coming year. For 8 of the past 10 years for me that event has been Ride the Rockies, a week-long road cycling adventure in the Colorado Rockies. RTR combines the physical challenge of cycling 400+ miles over 12,000 ft. mountain passes with the emotional escape from the world of TVs, cars and mobile devices (at least partially!) that makes for what I consider the perfect vacation. Imagine eating (and drinking) all you want for a week and still losing weight!


One of the things I like about RTR is every year the route is different. So over those 8 years I have ridden over most major mountain passes and visited numerous mountain towns in Colorado and yet every year brings something new: new scenery, new experiences and new friends. Each year the route is announced at the official Ride the Rockies Premiere Party in Denver. Riders who are able to attend get the first glimpse at the route midst a preview of the carb-heavy eating and drinking that will take place during the week provided by Maggiano's Little Italy and Odell Brewing Company

In the past two years I attended and posted/tweeted the route as it was announced live. Unfortunately I will be out of town this year and unable to attend. But don't worry, I will try to figure out a way to get the scoop and pass it along that night so stay tuned here or follow me on Twitter (@REAL_BEEFMAN) if you are interested.

Ride on!

Daren

Friday, December 26, 2014

BEEFMAN'S Roast Beast

When the young and old sit down to a feast at your house, on what do you feast? Do you feast on Who-pudding? Do you feast on rare Who-roast beast? If you feast on roast beast, on which beast do you feast?

So when it comes to the roast beast feast are are you a turkey, ham, or beef family? As I was watching "How the Grinch Stole Christmas" this year and heard the familiar lines about the Christmas feast in Whoville, "They would feast on Who-pudding, and rare Who-roast beast," I noticed the animal origin of Dr. Seuss's "roast beast" was left wide open to interpretation.

In some shots it looks something like a cross between a turkey...

...and a large rodent.

...or, somewhat disturbingly, even a dog.

Then there are the shots of the Grinch carving the roast beast and it looks more like a ham... 

...or a beef roast (which brings me to my point). 

Growing up the traditional Christmas dinner at my house was turkey. As if we didn't get enough turkey at Thanksgiving (and probably just threw out the last of the turkey leftovers a week ago), we'd essentially do Thanksgiving Dinner II. I'm not complaining. The food was always good, but everybody knows the sequel is never as good as the first one (as I was reminded last night watching "Night at the Museum" 1 and 2).

And then I learned how to cook a rib roast. To me, a rib roast is the ultimate Roast Beast. Cooked in the oven on Christmas Day it fills the house with the unmistakable aroma of beef and, served medium rare, it delivers the robust flavor and tender, juicy steak eating experience known as Prime Rib.

For the past several years I have done the rib roast in a 350F oven for about 90 minutes (until the internal temp reaches 125F), then let it rest for 15 minutes before carving. The results have been good but not great. And I want great, especially when hosting Christmas dinner! So this year I tried a new method I learned from one of the culinary experts at the National Cattlemen's Beef Association, Steve Wald (Steve is one of a team of people who develop and test recipes for BeefItsWhatsforDinner.com).

Steve's "restaurant method" combines low and slow cooking with a "blast" of high heat at the finish. The result was a nice, even red color from edge to edge with a crisp, flavorful crust on the outside. It worked so well I have decided to share my version of Steve's restaurant methods rib roast...

BEEFMAN's Roast Beast

1. Coat a 5-10 lb. bone-in Beef Rib Roast with your favorite rub. Return roast to refrigerator until ready to begin roasting.

Notes: The official Roast Beast recipe on the Random House Seussville website calls for a Beef Strip Loin roast, which would also be amazing. I plan on 1/2 lb. per person and then add a pound or two to make sure there is plenty (and hopefully some leftovers!). For the rub I use Safeway Select Mediterranean Roast Rub because I like Mediterranean seasoning, especially rosemary, on beef. Pretty much any meat rub with salt, pepper, and garlic will do. You can also just use some salt and pepper or make your own concoction.

2. Preheat oven to 160F. Place roast bone-side down on a rack on a roasting pan (if you don't have a rack, place bone-side down in a shallow roasting pan -- the bones raise the meat off the surface, forming a rack). Place on bottom rack in oven and roast for 5-6 hrs (I pull it when the internal temp reaches 125F for rare to medium rare). Remove from oven and let rest for 30 minutes to an hour, tenting loosely with aluminum foil.


Notes: At this point the outside of the roast will not look "done." The roast will continue to cook in its own heat/juices, rising another 5-10 degrees F in the first 10-15 minutes while resting then will hold that temp for up to an hour. Allowing the meat to rest at least 15 minutes is a crucial step in the process. This allows the juices to reabsorb into the meat, ensuring a juicy, flavorful roast.

Place your meat thermometer in the center of the "eye" of the rib, not resting in fat or touching bone.
3. Approximately thirty minutes prior to serving, heat the oven to 500F then place the roast back in the oven for 10 minutes. Keep an eye on the roast to make sure the rub doesn't start to burn. Remove from oven and let rest another 10-15 minutes before slicing.

Blasting the roast with high heat after letting it rest will ensure a nice crisp "crust" on the outside without raising the internal temperature and overcooking the meat.
Notes: The purpose of this step is to "blast" the outside of the roast with high heat. Cooking at this temp for such a short time will not raise the internal temperature, which should be holding around 135F (rare to medium rare).

4. Use a nice sharp butcher knife to slice between the rack (bones) and the meat, running the knife right along the bone (see picture). Slice roast into 1/2-1" thick slices and serve.

Run a sharp knife between the bones and the meat before slicing into 1/2-1" thick "steaks"
Notes: DO NOT throw away the bones! I like to save them then reheat on the grill or in the broiler. That's some good eating! A rib roast consists of two major muscles separated by a chunk of fat. I like to cut this fat off prior to serving to reduce the amount of fat left on everyone's plate at the end of the meal! Also, the two muscles offer two distinct flavor and tenderness levels. The circular "eye" portion of the rib eats a lot like a filet or strip steak. The thinner outer piece called the ribeye "cap" is a tender flavorful delicacy. If you want to get fancy you can remove the cap by simply cutting out the fat between the two muscles. You can then cut the "eye" into 1-2" filets and slice the "cap" into even portions to serve alongside the filet.

The first cut is the true test. Perfect rare to medium rare, no juices running off the cutting board.
And there you have it. A special meal for a special occasion. If you missed out on the real Roast Beast this Christmas, don't worry. A rib roast turns any meal into a feast -- a New Year's Day brunch, anniversary or birthday celebration or a Sunday dinner.

Enjoy!

BEEFMAN

Thursday, September 18, 2014

If it's not BEEF, it's not a "Burger"!

Today is #NationalCheeseburgerDay! I have no idea who designated it as such but I saw it on Twitter so it must be true :) And I've seen lots of blog posts on the topic (my favorite of which is 18 Ways to Celebrate National Cheeseburger Day). I love the concept of National Cheeseburger Day but some of the posts also brought out one of my pet peeves -- claims that "other" burgers are "healthier" than beef burgers.


Even though I had a cheeseburger for lunch AND dinner yesterday, I had to have another after learning that today is National Cheeseburger Day!

One particular post from Runner's World caught my eye because of the title, "Grill up a better burger tonight." My first thought was, "What could possibly be better than a good ol' American Cheeseburger?" So I clicked on the link.

The Runner's World article suggests that bison would be a leaner choice. That is simply not true. I covered this topic in detail in a post three years ago, "Is Bison Leaner then Beef? Whatever, Turkey!" which explores claims that so-called bison and turkey "burgers" are leaner than beef burgers.

The Runner's World article does correctly point out that veggie patties are high in fiber but typically have half the protein with more calories than a beef burger. Unfortunately, I often see articles suggesting veggie burgers would be a healthier choice. I wrote about the healthfulness of veggie patties versus beef burgers in  "Exposing the Big Fat (Beef) Lie."

But that brings me to another pet peeve and the actual point of this post. If it's not BEEF, it's not a BURGER! History and entomology support this fact. There are many claims about the origin of the hamburger, but all of them include BEEF. Most experts agree that Otto Krause, a Hamburger (person from Hamburg, Germany), was the first person to serve ground up pieces of beef served between two slices of bread. Clearly, the modern name "hamburger" validates this theory!

So, in honor of Otto Krause, the inventor of the Hamburger, I hereby offer this BEEFMAN PROCLAMATION on National Cheeseburger Day:

WHEREAS the original hamburger was a ground beef patty served between two slices of bread, not a ham patty, turkey patty, bison patty, veggie patty, or any other patty, and

WHEREAS the entomology of the word "burger" is a shortened form of the word hamburger (which refers to a ground beef patty served between two slices of bread),

BE IT RESOLVED that if it's not BEEF, it's not a burger!

Ride on,

Daren

Tuesday, September 16, 2014

What Do You Want to Be Remembered For?

In a break from my traditional posts related to cycling, running, triathlons, or BEEF, today's post is about your legacy: what do you want to be remembered for? This past weekend I had the opportunity to pose that question to a gathering of meat industry leaders at the Meat Industry Hall of Fame 2014 Induction Ceremony and Dinner (OK, so it is somewhat related to BEEF).


As we honored the new inductees for their work in improving meat safety, animal care and raising, safe, wholesome and nutritious meat products for consumers around the world, I wanted to challenge the audience to think about what they will be remembered for or, more important, what they want to be remembered for?
 
I know 16 minutes is a lifetime in this 140-characters-or-less world we live in but I hope you will take time to listen. Whether you are involved in the meat industry or not I think it will cause you to consider your life's legacy.
 
Ride on!
 
Daren

Sunday, September 7, 2014

BEEFWIFE: Two Mules for Sistah Sara's Short Ribs

Whenever I make my sister-in-law’s Sara's crockpot ribs, I think of “Two Mules for Sister Sara.”  This 1970’s Western starred Shirley MacLaine and Clint Eastwood and the theme song plays in my head because these are “Sistah Sara’s Ribs." 

Too bad I didn’t have this recipe when I met Clint Eastwood (below) while he was filming “In the Line of Fire” at the U.S. Treasury Department in 1992 (where I worked at the time).  He might have swept me away to Carmel if I had cooked Sistah Sara’s ribs for him!


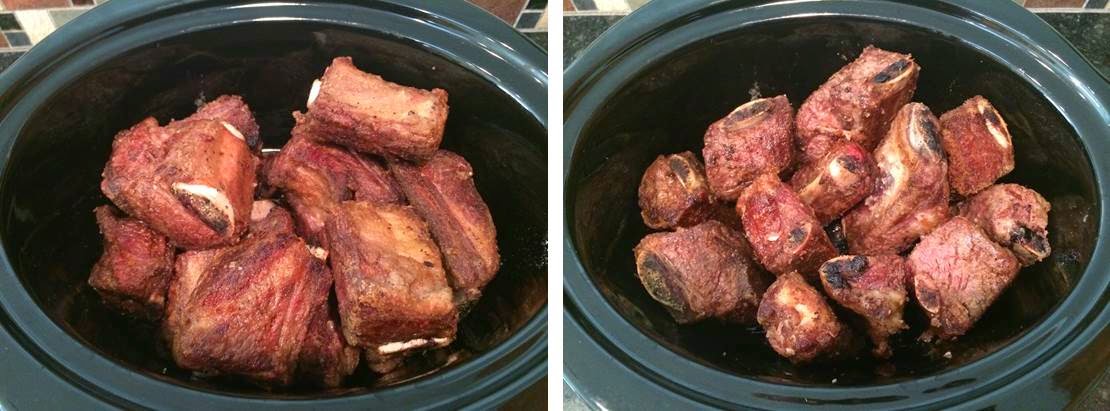
I made these last week before Shelby left for China (you can follow her blog, A Jayhawk Abroad, for the full story).  They are sticky and sweet and savory and fall-off-the-bone tender.  The perfect crockpot rib!


This looks like a lot of ingredients but you probably have most of these in your pantry or fridge (see full recipe below).


You need four pounds of BEEF short ribs; I can never find packages that exactly total four pounds but there is plenty of cooking liquid so if you’re a little over on weight, no worries.


Put the flour, salt and pepper in a plastic or paper bag and combine.  Add the ribs in batches; shake to coat and knock off the excess flour as you take them out of the bag.  In a heavy skillet, brown the ribs in the butter.  I start with half the butter and add more in as I switch out the browned ribs for the un-browned ones.


You’ll want to brown all sides; don’t rush this part, it seals in the juices. Here is my big dilemma with this recipe, do I lay the ribs flat in two layers or do I put them on end in a single layer (bones up)?


I feel like this is something I could discuss with The Pioneer Woman over a cup of coffee and she would feel my “pain.”  Guess what, it really doesn’t matter.  As I said before, there is enough cooking liquid and they cook down some so put them in however you like.


As the ribs are browned, put them in the bottom of your crockpot and drizzle with honey.  The recipe calls for 1/3 cup but I just squeeze the honey bear until they are coated well.  While you are browning the batches of ribs, you can get the other ingredients prepped.


I don’t use a lot of gadgets in the kitchen but since this recipe calls for five cloves of garlic, I use my garlic peeler and garlic press.  Pop the cloves in the peeler (a silicon tube that looks like a cannoli) and with downward pressure, roll the tube and out comes perfectly peeled garlic (thanks, Adam Kranz).  I got my first garlic press after having fondue at the Pillsbury cabin in Lake Tahoe back in 1997.  Drop a clove or two in the well, bring the handles together and out comes the minced garlic.  Just scrape the garlic off with the end with a knife and pop in more cloves.  Chop the onion into small dice.  Set the garlic and onion aside.  I measure the remaining ingredients into a 4-cup Pyrex measuring cup, gently mix and then set aside.


Once the ribs are all browned, I pour off most, but not all of the liquid from the skillet.  Toss in the onion and garlic and cook briefly (don’t burn the garlic) then gently pour in the remaining ingredient mixture.  Scrape the bottom of the pan to loosen the browned bits of BEEF and butter.


Cook over medium high heat until boiling and continue cooking, stirring occasionally, until mixture reduces and thickens (about 20 minutes).  Pour the mixture over the ribs; cover crockpot with lid and cook on low setting for six to eight hours.


Sweet, sticky, spicy and tender, perfect crockpot ribs!  And you can serve the liquid from the crockpot on the side (if you want it thicker, just put in a saucepan and continue cooking until reaching the desired consistency).

Sistah Sara’s Crockpot Ribs
2/3 cup all-purpose flour
2 teaspoons salt
1/2 teaspoon black pepper
4 pounds beef short ribs
1/4 cup butter
1/2 to 1 whole large onion, chopped (I use half an onion)
1 1/2 cups beef broth (I use one whole 14.5 oz. can)
3/4 cup red wine vinegar
3/4 cup packed brown sugar
1/2 cup chili sauce
1/3 cup ketchup
1/3 cup Worcestershire sauce
5 cloves garlic, minced
1/3 cup honey, more if you prefer

In a large re-sealable plastic bag, combine flour, salt and pepper. Add ribs to bag in batches and shake to coat. In a large heavy skillet, brown the ribs in the butter.


Transfer ribs to slow cooker and drizzle with honey. In the same skillet, combine the remaining ingredients. Cover and cook until mixture comes to a boil, stirring occasionally; pour over ribs. Cover and cook on low for 6-8 hours or until meat is tender.

Sunday, July 27, 2014

No Motivation to Workout? Me, Neither!

Where do you find motivation?
I need a goal. It's a beautiful summer morning in Colorado and I can't get motivated to walk, run, hike, or even bike this morning. I'm definitely going to get out and do something. It's just too nice a day to sit inside. But what happens when the weather starts to turn colder and the days are shorter and I'm still suffering from lack of motivation? It's too easy to fall out of a good exercise regimen (here are some good tips for staying motivated to workout from AskMen.com).

motivation
What are your goals?
What I need is to set a goal. What works for me is to sign up for an event and pay the registration fee. The question is, which event? Should I take on my first tri since 2011? That would force me into the pool when I'd rather take advantage of this weather. Tackle my first full marathon? I'm hesitant to sign up for one when I don't know if my "hot foot" issues on my left foot will flare up until I start running more. I've never done one of the Tough Mudder type adventure races. My 6'4", 220 lb. frame and lack of upper body strength make pulling myself over walls nearly impossible!

Tim Brown, on the first day of his first Ride The Rockies
Photo credit: Joe Murphy, The Denver Post

What is your excuse?
Sounds like a lot of excuses, doesn't it? Yeah, that's what happens when you have no motivation. There'd be times riding up a nasty climb or into a headwind on Ride the Rockies when I'd want to quit and I'd come across one of the many riders living with missing limbs, paralyzed from the waist down, many from injuries suffered defending our freedom, and I'd feel stupid. I came across Tom Brown, a triple amputee, several times on the ride this year.

Help me out here. What motivates you? What events do you have coming up this fall?

Ride on!

Daren

Saturday, July 19, 2014

Five Tips for Surviving Multiple Day Cycling Events and Century Rides

After surviving the longest Ride the Rockies in history in 2013 and toughest day ever on Ride the Rockies in 2014, I've learned a few lessons (the hard way) about how to survive long-mileage and multiple day rides. Actually, I've compiled these tips over the years, having finished eight RTRs and ten Bike MS rides (2-day, 150 miles) since I began long distance cycling in 2000.

Ride the Rockies 2014 was easily the most challenging of the eight I have completed, with over 30,000 ft. of elevation gain!

Participating in long-distance and multiple day rides requires a significant amount of training (this article has some great training tips for multi-day rides) to avoid suffering during the ride. Don't get me wrong, you can do long distance rides without a significant amount of training. I know a lot of people who do but most of them suffer the consequences, including more time on the bike each day and the resulting aches and pains that go with it!

Ride the Rockies 2013 became the longest in history when a reroute due to wildfires added 33 miles to the route.
Regardless of your training level, these five tips will help you survive your first century ride, multi-day charity ride or a week-long bike tour like Ride the Rockies:

1) Stretch Before You Get Sore/Tight -- Whether you believe in stretching before, during or after a workout (my brother is into dynamic stretching), one thing is clear: once you start to develop tightness/soreness it is hard to recover on a long distance or multi-day ride. By Day Three that little twinge had become a sharp-stabbing pain like a dagger being thrust under my right shoulder blade. The tightness in my right should eventually migrated to my lower back and right hip, running down my IT band to my knee (I must have been overcompensating on my right side). At times I was forced to get off the bike and stretch every 5-10 miles (even less when climbing) to relieve the pain.

2) Apply Chamois Butter Before You Start Chafing -- Speaking or pain, one of the most common questions I get after the ride is "does your butt hurt"? Seems like kind of a personal question but most people find it hard to fathom sitting on a small, hard bike saddle for hours and days on end (literally). No matter how much riding you do before the big event this can become a problem. They actually make a special product called Chamois Butt'r designed to prevent chafing and soreness. This year I finally got smart and applied it on the first day rather than waiting until saddle sores began to appear and I avoided them altogether. This tip also applies to sunscreen and lip balm. Just be sure to double check which tube you grab before applying (yes, I know someone who applied butt butter on their face as sunscreen).

3) Drink Before You Feel Thirsty -- I learned this lesson on my first Ride the Rockies when I ended up in the ER in Leadville, Colorado suffering from altitude sickness! Hydration is critical on long rides, especially when riding at altitude. I was able to stay hydrated for most of the ride this year. I did feel a little parched one day but recognized the tell-tale signs (I know I am getting dehydrated when I have difficulty swallowing while riding) and increased my water intake and it never became an issue. 

One 3 oz. serving of beef provides more than 10% of 10 essential nutrients and vitamins for less than 10% of your daily calories!
4) Eat Before You Feel Hungry (or fuel before you bonk) -- Similar to staying hydrated, it is important to keep fuel in your tank during a long ride. If you've ever run out of fuel (or bonked), you know what I mean! Fortunately, most long distance rides are supported and offer a variety of carbohydrate-rich foods along the route. I try to eat something at least every hour -- or at every aid station: fruit, pretzels, animal crackers, basically whatever they provide! I carry Clif Shot Bloks on me for fuel between stops. And, of course, at the end of the day I always seek out a big burger or steak to help my muscles repair fuel up for the following day on the zinc, iron, protein and B vitamins in beef.

5) Death Before SAG -- Until this year on Ride the Rockies I had never ridden in a Support and Gear (SAG) vehicle on a long ride. I have been fortunate to avoid a major mechanical breakdown requiring a ride and have vowed to never hitch a ride because I was tired, sore, or mentally done with the ride. This attitude is captured in a saying I heard on my first Ride the Rockies: Death Before SAG. I have never come close to a choice between death and sagging and obviously don't ever want to test it! For me, it's just an attitude you have to have going into the ride or you risk succumbing to the the temptation! There's a team on the Colorado Bike MS ride named "Ain't Too Proud to SAG." I think that's the wrong attitude (but, hey, they're doing it for a good cause!). To me, SAG is a last resort option in the event of a physical or mechanical breakdown (or thundersnow storms at the summit of Berthoud Pass).

Support and Gear (SAG) vans drive up and down the route rescuing riders who have broken down -- either mechanically, physically or mentally!
Photo credit: http://www.mvermeulen.com/rtr2009/
What multiple-day or long distance rides do you have coming up yet this summer? What tips would you share? Please post a comment!

Ride on!

Daren